
Cloud hosting offers incredible scalability and flexibility for modern applications. Leveraging the power of containerization with Docker can further enhance these benefits, allowing for efficient deployment, management, and scaling of your applications in the cloud. This article provides a comprehensive guide on how to effectively use Docker within a cloud hosting environment. We’ll explore the key concepts of Docker, including Docker images, Docker containers, and Docker Compose, and demonstrate how these tools can streamline your cloud hosting workflows. Whether you are deploying a simple web application or a complex microservice architecture, understanding how to use Docker in the cloud is crucial for optimizing resource utilization and achieving seamless application delivery.
From simplifying dependencies to enabling portability and fostering reproducibility, Docker presents a powerful solution for managing applications in a cloud hosting environment. This guide will cover the practical steps involved in setting up Docker, building Docker images, running Docker containers, and orchestrating them using Docker Compose. We will also delve into best practices for Docker security, optimization, and scaling within various cloud hosting platforms. By the end of this article, you will possess the knowledge and skills to confidently utilize Docker to enhance your cloud hosting experience and streamline your application deployment processes.
What Is Docker and Why Use It?
Docker is an open-source platform designed to simplify and streamline the process of building, shipping, and running applications. It utilizes containerization technology, packaging software and its dependencies into a standardized unit called a container. This container includes everything the application needs to run: code, runtime, system tools, system libraries, and settings.
The key benefit of using Docker is its ability to ensure consistency across different environments. By encapsulating the application within a container, Docker eliminates the common “works on my machine” problem. This consistency simplifies deployment, regardless of whether the target environment is a developer’s laptop, a testing server, or a production cloud environment. Portability and predictability are significantly enhanced.
Docker also promotes efficiency through lightweight resource utilization. Unlike virtual machines, which require a separate operating system for each instance, Docker containers share the host operating system’s kernel. This results in reduced overhead and faster startup times, enabling more efficient use of computing resources.
Furthermore, Docker offers strong isolation between applications. Containers operate in isolated environments, preventing conflicts and ensuring that one application’s issues do not impact others. This isolation enhances security and stability within the application ecosystem.
Installing Docker on a Cloud Server
The process of installing Docker on a cloud server is generally straightforward and consistent across various providers. However, specific commands might vary slightly depending on the chosen operating system (OS). This guide outlines the general steps involved, focusing on Ubuntu as an example. Always refer to the official Docker documentation and your cloud provider’s specific instructions for the most accurate and up-to-date information.
First, update the existing packages on your server using the appropriate command for your OS. For Ubuntu, this would typically be `sudo apt update` followed by `sudo apt upgrade`. This ensures your system has the latest software versions and dependencies.
Next, install the Docker Engine. Often, a convenience script is available to simplify this. For example, on Ubuntu, you might use `curl -fsSL https://get.docker.com | sh`. This command downloads and runs the installation script provided by Docker.
After installation, verify the installation by running a simple container like `sudo docker run hello-world`. This downloads a test image and runs it, confirming Docker is functioning correctly. If successful, a “Hello from Docker!” message will be displayed.
Finally, it’s often recommended, though not strictly required for basic usage, to add your user to the docker group. This allows you to run Docker commands without needing `sudo` each time. Use the command `sudo usermod -aG docker $USER` and then log out and back in (or restart your session) for the changes to take effect.
Creating and Running Containers
After installing Docker and configuring your cloud hosting environment, you can begin creating and running containers. A Docker container is launched from a Docker image. An image is essentially a read-only template with the necessary instructions for creating a running container. You can find many pre-built images on Docker Hub, a public registry for Docker images.
To pull an image from Docker Hub, use the docker pull command followed by the image name. For example, to pull the latest version of the official Ubuntu image, you would use docker pull ubuntu. Specifying a tag, such as docker pull ubuntu:20.04, allows you to pull a specific version of the image.
Once you have the desired image, you can create a container using the docker run command. The most basic usage is docker run image_name, replacing image_name with the name of your image. This will start a container in the foreground. To run a container in the background (detached mode), use the -d flag: docker run -d image_name.
Port mapping is crucial for accessing applications running inside your container. Use the -p flag to map a host port to a container port. For example, docker run -d -p 8080:80 image_name maps port 8080 on the host machine to port 80 in the container. This would allow you to access a web server running on port 80 within the container by visiting port 8080 on your host machine or cloud instance’s public IP address.
Using Docker Compose for Multi-Container Apps
Docker Compose simplifies the management of multi-container applications. It uses a YAML file to define the services that make up your application, including their dependencies, networking, and volumes. This allows you to define complex application stacks with ease.
With a single command, you can build, start, and stop all the containers defined in your docker-compose.yml file. This streamlines the development and deployment process, especially in cloud hosting environments.
Key benefits of using Docker Compose include simplified configuration, isolated environments, and portability across different cloud providers. It allows you to define environment variables, map ports, and mount volumes, ensuring consistent behavior across development, testing, and production environments.
For example, a web application stack might include a web server, a database, and a caching service. Docker Compose allows you to define each of these services, their dependencies, and their configurations within a single file, making management far more efficient.
Docker vs Virtual Machines
When choosing a virtualization technology for your cloud hosting environment, understanding the key differences between Docker and Virtual Machines (VMs) is crucial. While both offer resource isolation and environment management, they achieve this through different mechanisms, leading to distinct performance characteristics and use cases.
Virtual Machines emulate entire hardware systems, including the operating system (OS). Each VM runs its own kernel, resulting in significant overhead in terms of resource consumption. This also means VMs are generally larger and slower to boot.
Docker, on the other hand, utilizes the host operating system’s kernel. Containers, the units of virtualization in Docker, share the kernel and system resources. This significantly reduces overhead, leading to smaller footprints, faster startup times, and greater efficiency in resource utilization.
The table below summarizes the key differences:
| Feature | Docker | Virtual Machines |
|---|---|---|
| OS | Shared Kernel | Dedicated OS |
| Size | Smaller | Larger |
| Boot Time | Faster | Slower |
| Resource Efficiency | Higher | Lower |
Storing Docker Images Securely
Securely storing your Docker images is crucial for protecting your applications and infrastructure. Choosing the right registry is the first step. Private registries offer greater control over access and security compared to public registries. Popular options include Docker Hub’s private repositories, AWS Elastic Container Registry (ECR), Google Container Registry (GCR), and Azure Container Registry (ACR). Self-hosting a registry solution like Harbor is also a viable option for maximum control.
Implement role-based access control (RBAC) within your chosen registry. This allows you to define granular permissions, ensuring that only authorized users and systems can access, pull, or push images. Regularly scan your images for vulnerabilities using tools like Clair or Anchore Engine. This helps identify and address security flaws within your application dependencies before deployment.
Sign your images using Docker Content Trust. This cryptographic signature verifies the image’s integrity and authenticity, preventing unauthorized modifications or tampering. Consider using immutable infrastructure practices. Instead of updating existing containers, deploy new containers from updated images. This approach simplifies rollback procedures and reduces the risk of configuration drift.
Best Practices for Cloud Deployment
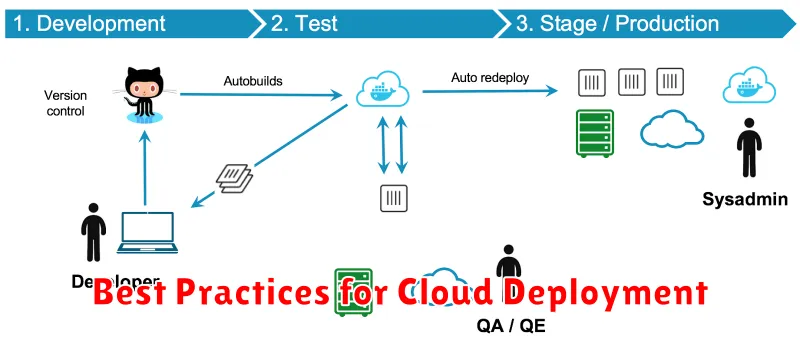
Employing Docker in a cloud environment requires adherence to certain best practices for optimal performance and security. Image optimization is crucial. Minimize image size by using multi-stage builds and removing unnecessary dependencies. This reduces storage costs and deployment times.
Security scanning is paramount. Regularly scan images for vulnerabilities using reputable tools. Implement robust access control policies to limit container privileges and prevent unauthorized access to sensitive data.
Orchestration simplifies management at scale. Leverage tools like Kubernetes or Docker Swarm to automate deployment, scaling, and networking of your containers. This enables efficient resource utilization and high availability.
Monitoring and logging are essential for maintaining a healthy deployment. Implement comprehensive monitoring to track resource usage, performance metrics, and application health. Centralized logging provides valuable insights into application behavior and facilitates troubleshooting.
Finally, consider a continuous integration and continuous delivery (CI/CD) pipeline. This automates the building, testing, and deployment of your Docker images, ensuring rapid and reliable releases.