
In today’s demanding digital landscape, ensuring high availability and fault tolerance for your applications is paramount. A load balancer distributes incoming network traffic across multiple targets, such as EC2 instances, containers, and IP addresses, thereby preventing overload on any single resource. This article provides a comprehensive guide on how to configure a load balancer in AWS, leveraging the power of Elastic Load Balancing (ELB) to optimize performance, improve scalability, and enhance the resilience of your infrastructure. Learn how to choose the right AWS load balancer type for your needs, configure listener rules, health checks, and more. Whether you’re working with web applications, microservices, or other distributed systems, understanding load balancing in AWS is crucial for building robust and scalable solutions.
This tutorial will walk you through the process of setting up a load balancer in AWS step-by-step. We’ll cover various ELB types, including Application Load Balancers, Network Load Balancers, and Classic Load Balancers, highlighting their specific use cases and configuration options. You’ll learn how to register targets with your AWS load balancer, configure security groups for enhanced security, and monitor the performance of your load balanced applications. By the end of this guide, you’ll be equipped with the knowledge to effectively utilize AWS load balancing to achieve high availability and scalability for your deployments.
Why Use Load Balancing in AWS?
Load balancing plays a crucial role in ensuring the availability and scalability of your applications in the AWS cloud. It distributes incoming traffic across multiple targets, such as EC2 instances, containers, and IP addresses, preventing any single target from becoming overloaded.
By distributing traffic, load balancing enhances fault tolerance. If one target fails, the load balancer automatically redirects traffic to the remaining healthy targets, ensuring uninterrupted service for your users. This eliminates single points of failure and improves the overall reliability of your applications.
Furthermore, load balancing simplifies scalability. As your application’s traffic grows, you can easily add more targets to the pool, and the load balancer will automatically distribute the increased load. This allows you to handle traffic spikes and accommodate growth without manual intervention.
Load balancing also offers improved performance. By distributing traffic, it prevents any single target from being overwhelmed, resulting in faster response times for users and a better overall user experience.
Understanding Elastic Load Balancing
Elastic Load Balancing (ELB) is a fully managed service that automatically distributes incoming application traffic across multiple targets, such as Amazon EC2 instances, containers, IP addresses, and Lambda functions. It acts as a single point of contact for clients, seamlessly routing requests and improving the availability and fault tolerance of your applications.
ELB offers several key benefits. By distributing traffic, it prevents any single target from becoming overloaded. If a target fails, ELB automatically reroutes traffic to the remaining healthy targets, ensuring continuous operation. ELB also scales its capacity to handle fluctuating traffic demands, eliminating the need for manual intervention.
AWS provides different types of load balancers, each designed for specific use cases. These include the Application Load Balancer for HTTP/HTTPS traffic, the Network Load Balancer for TCP and UDP traffic at the connection level, and the Gateway Load Balancer for deploying, scaling, and managing virtual appliances.
Choosing the right load balancer depends on the type of traffic your application handles and the level of control you require over the routing process. Understanding the characteristics of each type is crucial for optimal performance and cost-effectiveness.
Setting Up a Target Group
A target group is a logical grouping of targets, such as EC2 instances, IP addresses, Lambda functions, or ECS tasks, that receive traffic from a load balancer. It’s essential to configure your target group correctly to ensure traffic is routed appropriately.
When creating a target group, you must specify several key parameters. First, you must choose a target type. This determines the kinds of targets you can register with the target group. Common target types include instances, IP addresses, and Lambda functions. You must also select a protocol and port. These settings dictate how the load balancer communicates with the targets.
Another crucial aspect is the health check. The health check allows the load balancer to monitor the health of your targets. It periodically sends requests to the targets and checks for a healthy response. You can configure the health check path, port, protocol, and interval to suit your application’s needs. Unhealthy targets are automatically deregistered from the target group, ensuring traffic is only directed to healthy instances.
Creating and Configuring an ELB
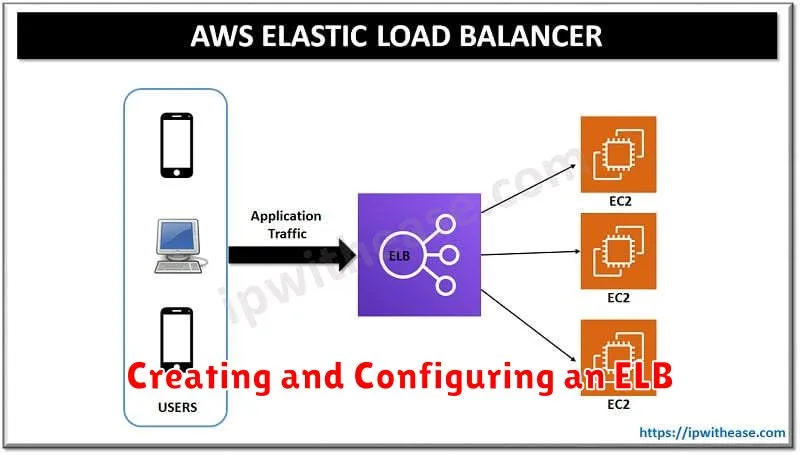
The first step in configuring a load balancer in AWS is creating an Elastic Load Balancing (ELB) instance. AWS offers several types of load balancers, including Application Load Balancers, Network Load Balancers, and Classic Load Balancers. Choosing the correct type depends on your specific needs. Application Load Balancers operate at the application layer (layer 7), Network Load Balancers operate at the transport layer (layer 4), and Classic Load Balancers operate at both layers.
After selecting the appropriate load balancer type, you’ll need to configure it. This involves several key steps. First, define the load balancer scheme, which determines whether the load balancer operates internally within your VPC or externally, facing the internet. Next, configure listeners that specify the ports and protocols the load balancer will monitor.
A critical part of configuration is registering target groups or instances. Target groups allow you to register multiple EC2 instances, IP addresses, Lambda functions, or other resources to receive traffic routed by the load balancer. Once the target group is defined, you need to configure health checks to ensure the load balancer only directs traffic to healthy targets.
Health Checks and Listener Rules
Health checks are crucial for ensuring your load balancer directs traffic only to healthy instances. The load balancer periodically sends requests to your registered instances to determine their health. You can configure the protocol, port, path, and healthy/unhealthy thresholds to suit your application’s needs. A healthy instance is one that responds successfully to the health check requests within the specified parameters.
Listener rules determine how the load balancer routes traffic based on incoming requests’ characteristics. These rules allow for flexible traffic management, enabling you to route traffic based on the host, path, HTTP header, or query string. Each rule consists of conditions and actions. Conditions define the criteria for matching incoming requests, and actions specify how the load balancer should handle matching requests. For example, you can route requests to different target groups based on the URL path.
Integrating with Auto Scaling
Integrating your load balancer with Auto Scaling is crucial for maintaining application availability and scalability. Auto Scaling dynamically adjusts the number of instances in your application’s fleet based on real-time demand. When combined with a load balancer, this ensures incoming traffic is distributed efficiently across a healthy pool of instances, even during peak periods.
To integrate, you’ll configure the launch template or launch configuration used by your Auto Scaling group to register new instances with the target group of your load balancer. This ensures that as Auto Scaling launches new instances, they are automatically added to the pool of resources managed by the load balancer.
Similarly, when Auto Scaling terminates instances, they are automatically deregistered from the target group, preventing traffic from being routed to unhealthy or unavailable instances. This dynamic registration and deregistration process ensures that your application remains responsive and available, even under fluctuating load conditions. Monitoring your application’s performance metrics is essential for fine-tuning the Auto Scaling configuration and optimizing resource utilization.
Monitoring with CloudWatch
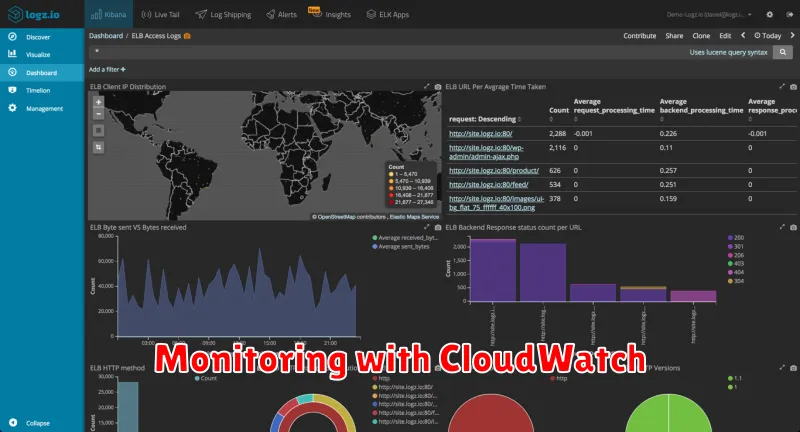
Amazon CloudWatch provides essential monitoring tools for your load balancer. It collects, aggregates, and displays real-time metrics, giving you valuable insights into its performance and health.
Key metrics to monitor include RequestCount, which tracks the number of requests processed, and HealthyHostCount/UnHealthyHostCount, showing the health status of registered targets. Latency metrics like TargetResponseTime and RequestProcessingTime are crucial for identifying performance bottlenecks. CloudWatch alarms can be configured to notify you of unusual patterns or when thresholds are breached, enabling proactive issue resolution.
By leveraging CloudWatch dashboards, you can visualize these metrics, providing a comprehensive overview of your load balancer’s operational status. This allows for quick identification of potential issues and aids in optimizing its configuration for optimal performance.