
In today’s fast-paced technological landscape, cloud deployments are crucial for businesses seeking agility and scalability. Automating these deployments is no longer a luxury but a necessity for achieving efficiency and reducing the risk of human error. This article provides a comprehensive guide on how to leverage the power of Terraform to automate your cloud deployments, streamlining your infrastructure management and enabling faster, more reliable releases. Whether you’re deploying to AWS, Azure, Google Cloud, or another cloud provider, understanding Terraform is essential for modern DevOps practices. We’ll explore the key concepts and practical steps involved in using Terraform for infrastructure as code (IaC), allowing you to define, provision, and manage your entire cloud infrastructure through code.
This guide will cover everything from Terraform installation and configuration to creating and managing complex multi-cloud deployments. We’ll delve into the core components of Terraform, including providers, resources, modules, and state management. Learn how to define your infrastructure using HashiCorp Configuration Language (HCL) and leverage the power of Terraform‘s declarative syntax to ensure consistent and reproducible deployments. By the end of this article, you’ll be equipped with the knowledge and skills to confidently automate your cloud deployments with Terraform, unlocking the full potential of cloud computing for your organization.
What Is Terraform and Why Use It?
Terraform is an open-source infrastructure-as-code (IaC) tool developed by HashiCorp. It allows you to define and provision your cloud infrastructure using a declarative configuration language called HashiCorp Configuration Language (HCL), or optionally JSON.
Instead of manually clicking through a cloud provider’s console, you describe your desired state in code. Terraform then compares this desired state with the actual state of your infrastructure and creates, modifies, or deletes resources as needed to achieve the desired state. This process is often referred to as a “plan and apply” workflow.
Using Terraform offers several key benefits:
- Automation: Eliminates manual processes, reducing human error and saving time.
- Consistency: Ensures consistent infrastructure deployments across different environments.
- Version Control: Terraform configurations can be stored in version control systems like Git, enabling collaboration and tracking of changes.
- Reproducibility: The same configuration can be used to deploy identical infrastructure multiple times.
- Multi-Cloud Support: Terraform supports various cloud providers (AWS, Azure, GCP, etc.), enabling hybrid cloud deployments.
Installing and Setting Up Terraform CLI
The first step in utilizing Terraform is installing the command-line interface (CLI). The installation process varies depending on your operating system. Refer to the official Terraform documentation for detailed instructions specific to your OS.
After installation, verify the installation by running terraform -version in your terminal. This command should display the installed Terraform version. A successful output confirms correct installation.
Next, configure Terraform to work with your chosen cloud provider. This involves setting up credentials and configuring access permissions. Access keys, secret keys, and other provider-specific details are necessary. These credentials are often stored in environment variables or configuration files for secure access.
Finally, create a directory for your Terraform project. Within this directory, you will create your Terraform configuration files (.tf files). These files define the infrastructure you wish to manage and deploy using Terraform’s declarative language. Initializing a new Terraform project within this directory using terraform init downloads the necessary provider plugins based on your configuration.
Writing Your First Terraform Script
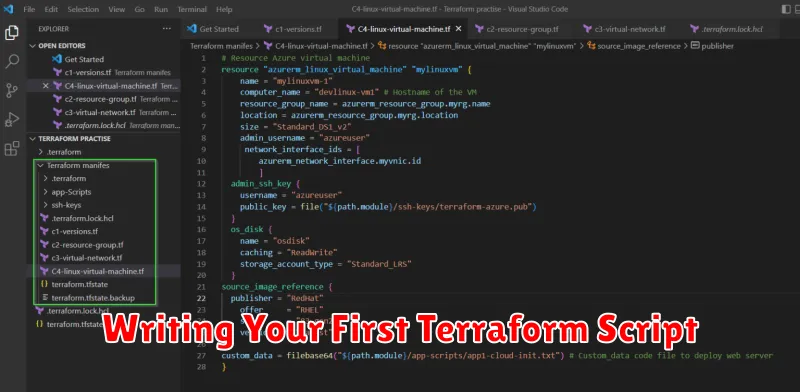
Let’s create a simple Terraform script to deploy a single virtual machine instance. This example uses AWS, but the principles apply across different cloud providers. You’ll need an AWS account configured with proper credentials. Terraform interacts with your cloud provider using these credentials.
First, define the provider block. This tells Terraform which cloud platform to use. Within the provider block, specify the region where you want to deploy your resources.
Next, define the resource block. Resources are the infrastructure components you wish to create. Each resource has a type and a name. For instance, to create an AWS EC2 instance, you would use the “aws_instance” type.
Within the resource block, you define arguments, such as ami (Amazon Machine Image), instance_type (size of the instance), and key_name (for SSH access). These arguments specify the configuration of the resource you are creating.
Provisioning Infrastructure on AWS, Azure, or GCP
Terraform’s strength lies in its ability to provision infrastructure across various cloud providers, including AWS, Azure, and GCP. This eliminates the need for platform-specific tools and languages, streamlining the deployment process. By defining resources within configuration files, Terraform interacts with each provider’s API to create, modify, or delete components.
To begin, you must configure the desired provider in your Terraform configuration. This involves specifying the provider name, region, and required credentials. For instance, setting up the AWS provider requires access key ID and secret access key.
With the provider configured, you can then define the infrastructure components needed for your application. This might include virtual machines, networks, databases, and load balancers. Terraform handles the underlying complexities of resource creation, ensuring consistency across deployments regardless of the chosen cloud platform.
Using Variables, Outputs, and Modules
Variables, outputs, and modules are crucial components for creating flexible and reusable Terraform configurations. Variables allow you to parameterize your deployments, making them adaptable to different environments or use cases. You can define variables with types, descriptions, and default values.
Outputs expose values from your Terraform state. These values can be used by other Terraform configurations or accessed directly by users. Common examples include IP addresses, DNS names, or load balancer URLs. Defining outputs facilitates easy integration with other systems and simplifies access to important information.
Modules encapsulate reusable Terraform configurations. They promote code organization, reduce duplication, and simplify complex deployments. Modules can be sourced locally or from remote repositories, enabling collaboration and sharing of best practices. They accept input variables and can provide outputs, creating self-contained building blocks for your infrastructure.
Managing State Files Safely
Terraform’s state file is critical. It maps real-world resources to your configuration, allowing Terraform to track and manage infrastructure effectively. Mishandling this file can lead to inconsistencies or even accidental destruction of resources. Therefore, securing and properly managing the state file is paramount.
Never store the state file on a local machine for production deployments. This presents a single point of failure and prevents collaboration. Instead, leverage a remote backend. Popular options include cloud storage services like Amazon S3, Azure Blob Storage, or Google Cloud Storage.
Remote backends offer several advantages, including state locking. This mechanism prevents concurrent modifications, mitigating the risk of corruption or conflicts when multiple users or automated systems work with the same infrastructure.
Encryption is another crucial aspect. Encrypt your state file at rest to protect sensitive data, such as access keys and credentials. Most remote backends provide encryption options.
Finally, consider versioning. Storing state file versions allows rollback to previous states, offering an essential safety net for disaster recovery or troubleshooting.
CI/CD Integration and Automation
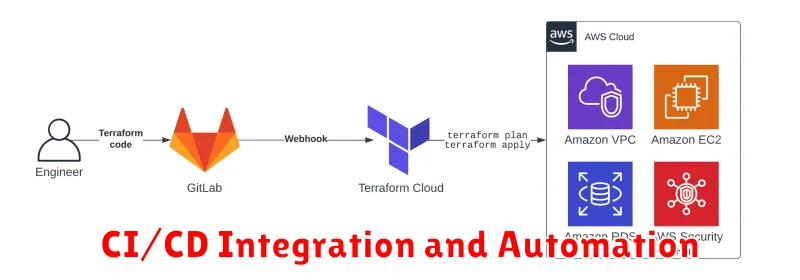
Continuous Integration/Continuous Delivery (CI/CD) pipelines are crucial for automating the deployment process managed by Terraform. Integrating Terraform with a CI/CD system allows for automated testing, validation, and deployment of infrastructure changes.
Upon code changes being pushed to a repository, the CI/CD pipeline can be triggered to automatically execute Terraform commands. This includes terraform plan for previewing changes and terraform apply for deploying the changes to the target environment. This automation reduces manual intervention and ensures consistent and reliable infrastructure deployments.
Popular CI/CD tools like Jenkins, GitLab CI/CD, Azure DevOps, and GitHub Actions provide seamless integration with Terraform. These tools offer features for managing secrets, variables, and environments, further enhancing the automation capabilities.
By leveraging CI/CD, organizations can achieve faster deployment cycles, improved collaboration among teams, and reduced risk of human error in infrastructure management.